After trying to port over some of Google’s code I’ve been tempted to try and remove storyboards as a dependency in some of my projects and move on to creating the views programmatically. It’s a lot more work but the benefits are clear. If you’ve ever used Storyboards before you’d know how painful merge conflicts can be. If you’ve ever wanted to reuse UI code from a previous project you’d know that you’d need to bring over a copy of the specific view controller from that storyboard, otherwise you’d need the entire storyboard. The final advantage that I can think of off the top of my head is that by creating views programmatically in iOS also helps alleviate the dependency of Xcode itself, meaning that now you are more free to do most of your editing in a 3rd party program and you won’t have to switch to Xcode as often get your work done. Since I’m not a huge fan of Xcode this is a big plus to me, however I also know people who love Xcode and still prefer making their views programmatically.
Here are some links I’ve found to get started:
- Your First App 100% Programmatically, Part 1 - Setting up the app delegate
- Your First App 100% Programmatically, Part 2 - Creating the View Controller
I’ll let the code do the talking.
Here’s the tl;dr of the first article:
AppDelegate.swift
class AppDelegate: UIResponder, UIApplicationDelegate {

  var window: UIWindow?

  func application(_ application: UIApplication,
      didFinishLaunchingWithOptions launchOptions: [UIApplicationLaunchOptionsKey: Any]?)
      -> Bool {
    // Override point for customization after application launch.
    // instantiate your view controller, in this case it's called ViewController
    let mainVc = ViewController()
    // optional: if you want a nav controller, create one, if not skip this
    let navController = UINavigationController.init(rootViewController: mainVc)

    // create a full screen window. Now that the window may not be full screen
    // if you are missing a launch image or launch screen storyboard
    self.window = UIWindow(frame: UIScreen.main.bounds)
    // set root VC to navController, or mainVc if you don't want a navController
    self.window!.rootViewController = navController
    self.window!.makeKeyAndVisible()

    return true
  }

  // ...

}
The main takeaway from the second article is that we can do some awesome stuff with swift when we want to create our subviews:
ViewController.swift
enum kNavController {
  static let TOP_MARGIN: CGFloat = 20
}

class ViewController: UIViewController {

  // buttons can be lazily initialized and declared with a ! to avoid
  // unwrapping later :)
  lazy var button: UIButton! = {
    let view = UIButton(type: .system)
    view.setTitle("Can't touch this!!", for: .normal)
    view.sizeToFit()

    // you can even position the button within this function.
    var frame = view.frame
    // position button directly under the nav bar.
    frame.origin.y = kNavController.TOP_MARGIN
        + self.navigationController!.navigationBar.bounds.size.height
    view.frame = frame

    return view

    // the empty arg list `()` on the line below is necessary.
  }()

  override func viewDidLoad() {
    super.viewDidLoad()

    // set the background color of the VC to white
    self.view!.backgroundColor = .white

    // add our button to the vc
    view.addSubview(self.button)

    // Do any additional setup after loading the view, typically from a nib.
  }

  // ...

}
Initialization and Sizing
First thing to understand is initialization of views. Probably the most common
is init(frame:). For example to create a simple UILabel:
lazy var instructionsLabel: UILabel! = {
  // init with size zero (CGRectZero() in objc) to give it a default value
  // actual size is computed and changed later.
  let label = UILabel(frame: .zero)

  // set text, and other options
  label.text = "To use this app, please check the link in the other thingamabob"
  label.numberOfLines = 0
  label.textAlignment = .center

  // set width to 75% of current view's width
  let width = self.view!.bounds.size.width * 0.75
  // get us a vertical size to fit the width (75% of width)
  let size = label.sizeThatFits(CGSize(width: width,
      height: CGFloat.greatestFiniteMagnitude))

  // create a mutable copy of the label's frame so we can change it
  var frame = label.frame

  // set the size
  frame.size = size

  // assign the new frame to our label
  label.frame = frame

  // center the label in view controller
  label.center = self.view.center

  return label
}()
Now I did say simple label. This has some customizations to it as well that
I wanted to demonstrate, like positioning and sizing, which I’ll come back to
later. The general idea is you start with a frame of size zero and then force
the view to resize itself appropriately. In this case I wanted the width
to be a specific size so I used sizeThatFits() to create a CGSize that
would give me the appropriate height for my label, given 75% of the screen’s
available width.
For UIButton
you want to use the init(type:) initializer:
lazy var cantTouchThisButton: UIButton! = {
  // create a system button. This is the default style with the
  // light blue text
  let button = UIButton(type: .system)

  // set a title
  button.setTitle("Can't touch this!!", for: .normal)

  // shrink wrap it so that the button is large enough to fit the title and
  // no larger
  button.sizeToFit()

  // create a mutable copy of the frame to manipulate size/position
  var frame = button.frame

  // position this button below the instructions label, adding a margin
  // between the top of this button and the bottom of the instructionsLabel
  // view.
  frame.origin.y = self.instructionsLabel.frame.origin.y
    + self.instructionsLabel.frame.size.height
    + k.VIEW_MARGIN

  // center it on the X axis (horizontally)
  frame.origin.x = self.centerScreenX - frame.midX

  // assign the modified frame back to the button
  button.frame = frame

  // assign an action to this button so it does something when you press it.
  button.addTarget(self, action: #selector(cantTouchThisButton_tapped),
      for: .touchUpInside)

  return button
}()

// MARK - UI Events

// you can optionally add an @IBAction in front here, but that might get
// confusing since that will create an outlet that's not connected to anything
// in Xcode.
func cantTouchThisButton_tapped(sender: UIButton) {
  print("You touched this!")
}
the type variable takes an enum value from
UIButtonType.
Options include:
- case
custom- No button style. - case
system- A system style button, such as those shown in navigation bars and toolbars. - case
detailDisclosure- A detail disclosure button. - case
infoLight- An information button that has a light background. - case
infoDark- An information button that has a dark background. - case
contactAdd- A contact add button. - static var
roundedRect: UIButtonType - A rounded-rectangle style button.
This button is also created with size zero as far as I know. Then it is resized
with sizeToFit() which basically shrink wraps it to make the button the
minimum size to fit its content.
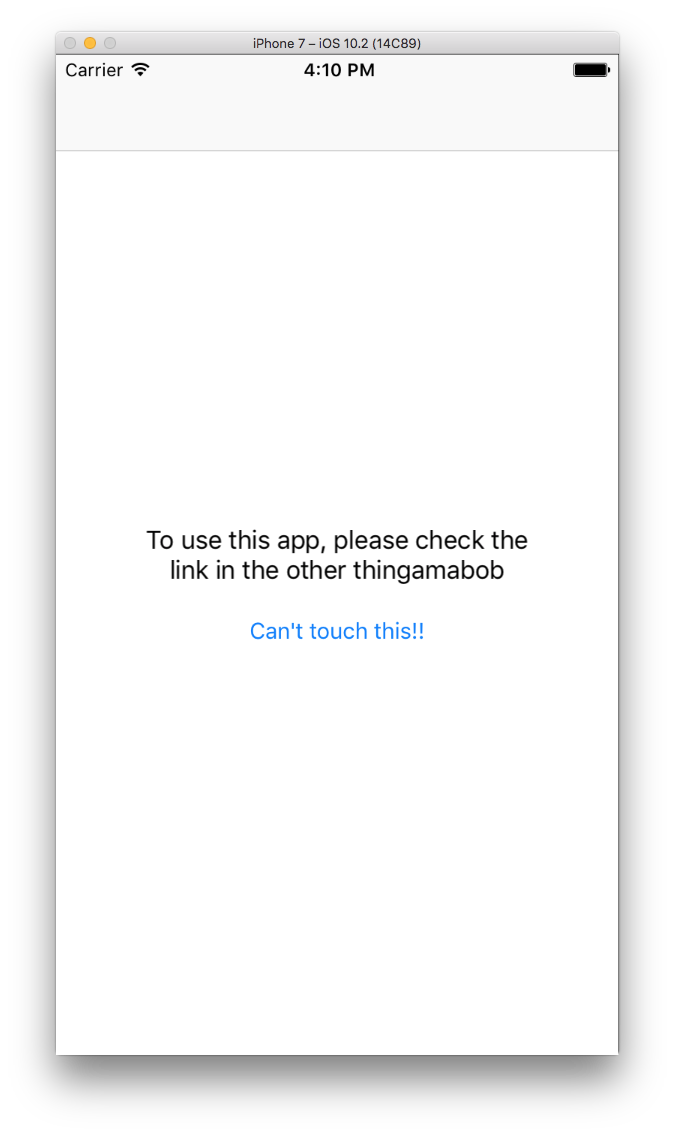
The view now looks like this
Positioning Techniques
Constraints
Constraints are still available. I’ll quote the original post I linked above for an example of Constraints, but I’ll tell you well in advance that I have no intention of using them. In my mind, if I’m placing views purely programmatically, this should be done so in place of constraints. Many list “dynamic ui” as an advantage of implementing views in pure code and while I don’t see that as much of an advantage I kind of agree that there’s no point in getting involved with them if I don’t have to.
Here’s the example from the document I linked above:
func textFieldConstraints() {
  NSLayoutConstraint(
      item: textField,
      attribute: .CenterX,
      relatedBy: .Equal,
      toItem: view,
      attribute: .CenterX,
      multiplier: 1.0,
      constant: 0.0)
      .active = true

  NSLayoutConstraint(
      item: textField,
      attribute: .Width,
      relatedBy: .Equal,
      toItem: view,
      attribute: .Width,
      multiplier: 0.8,
      constant: 0.0)
      .active = true

  NSLayoutConstraint(
      item: textField,
      attribute: .Top,
      relatedBy: .Equal,
      toItem: view,
      attribute: .Bottom,
      multiplier: 0.1,
      constant: 0.0)
      .active = true
}

func buttonConstraints() {
  // Center button in Page View
  NSLayoutConstraint(
    item: button,
    attribute: .CenterX,
    relatedBy: .Equal,
    toItem: view,
    attribute: .CenterX,
    multiplier: 1.0,
    constant: 0.0)
    .active = true

  // Set Width to be 30% of the Page View Width
  NSLayoutConstraint(
    item: button,
    attribute: .Width,
    relatedBy: .Equal,
    toItem: view,
    attribute: .Width,
    multiplier: 0.3,
    constant: 0.0)
    .active = true

  // Set Y Position Relative to Bottom of Page View
  NSLayoutConstraint(
    item: button,
    attribute: .Bottom,
    relatedBy: .Equal,
    toItem: view,
    attribute: .Bottom,
    multiplier: 0.9,
    constant: 0.0)
    .active = true
}

override func updateViewConstraints() {
    textFieldConstraints()
    buttonConstraints()
    super.updateViewConstraints()
}
He updates the constraints by calling this buttonConstraints() method in his
updateViewConstraints() method. It’s definitely a lot cleaner looking than
when I tried it in Objective-C years ago, but I’m still not a huge fan. I think
mostly because you have to create each constraint for each particular rule.
I’d rather just have an abstraction, like some sort of category to UIView that
I’d be able to write self.startButton.placeBelow(view: self.imageView, margin:
10) that would let me tie startButton’s Y position to the bottom of
imageView, + 10.
There are probably some libraries that do this already I have to look into it and see if they are well kept, but if not it’s fairly easy to create one.
Points
It’s also possible to do all this with raw CGPoints or even during
initialization by creating a new frame with CGRect’s init(x:y:width:height):
lazy var framedLabel: UILabel! = {
  let label = UILabel(frame: CGRect(x: 50, y: 70, width: 100, height: 100))

  // set background color so we can see the darn thing
  label.backgroundColor = .gray

  return label
}()

lazy var pointPositionedLabel: UILabel! = {
  let label = UILabel(frame: .zero)

  // set text since this time we'll use `sizeToFit()`
  label.text = "Fit to this size, plx"
  label.sizeToFit()

  var frame = label.frame
  frame.origin = CGPoint(x: 160, y: 70)
  label.frame = frame

  return label
}()
Combine this with some math and you’re in pretty good shape.
Center
You can also move the views from their center using the UIView.center
property which is mutable:
lazy var centerPositionedLabel: UILabel = {
  let label = UILabel(frame: .zero)

  label.backgroundColor = .blue

  var frame = label.frame
  frame.size.width = 100
  frame.size.height = 100
  label.frame = frame

  label.center = CGPoint(x: self.view.frame.midX,
      y: self.view.frame.midY - label.frame.height)

  return label
}()
Also note I could have assigned label.center = self.view.center. In this
case I didn’t because in my running example here I already have a label placed
there and I didn’t want to overlap it. I also used this to demonstrate the
midX property. midX and midY represent the middle of the view’s X and Y
coordinates respectively. There’s also a maxY and maxX that could be used
for placing views close to the edge of another view.
The cantTouchThisButton from the earlier example was originally positioned
using:
frame.origin.y = self.instructionsLabel.frame.origin.y
  + self.instructionsLabel.frame.size.height
  + k.VIEW_MARGIN
But could be re-written as:
var frame = button.frame
frame.origin.y = self.instructionsLabel.frame.maxY + k.VIEW_MARGIN
frame.origin.x = self.centerScreenX - frame.midX