I was working recently on one of my iOS apps that depends heavily on web services and realized that I never handled the offline scenario for when the user has no internet connectivity. The fix for this was to supply some of the information for my app inside the app bundle in a JSON file in the same format that I would retrieve it from the actual web service.
Here are some quick notes about reading files on iOS. Detailed explanation follows code.
tl;dr - Quick code reference
  //get file name
  NSString *fileName = [[NSBundle mainBundle] pathForResource:@"party"
         ofType:@"json"
    inDirectory:@"data"];

  //check file exists
  if (fileName) {
    //retrieve file content
    NSData *partyData = [[NSData alloc] initWithContentsOfFile:fileName];

    //convert JSON NSData to a usable NSDictionary
    NSError *error;
    NSDictionary *party = [NSJSONSerialization JSONObjectWithData:partyData
      options:0
        error:&error];

    if (error) {
      NSLog(@"Something went wrong! %@", error.localizedDescription);
    }
    else {
      NSLog(@"party info: %@", party);
    }
  }
  else {
    NSLog(@"Couldn't find file!");
  }
Step 1 - Add the file to your project
In this example, I’ll be adding a file called party.json. My code structure
for the project looks like this:
.
|-- LoadFile
|   |-- AppDelegate.h
|   |-- AppDelegate.m
|   |-- Base.lproj
|   |-- Images.xcassets
|   |-- Info.plist
|   |-- ViewController.h
|   |-- ViewController.m
|   |-- data
|   |   `-- party.json
|   `-- main.m
|-- LoadFile.xcodeproj
`-- LoadFileTests
    |-- Info.plist
    `-- LoadFileTests.m
As you can see the party.json file is located in a data folder. Since I want
to preserve that, I’ll add the whole data folder to my project.
-
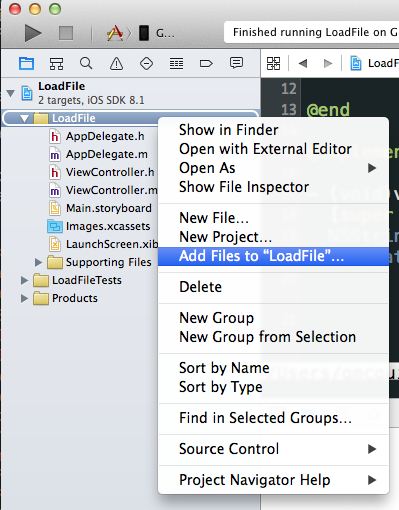
In the Project Navigator, right click and select Add files to “ProjectName”…

-
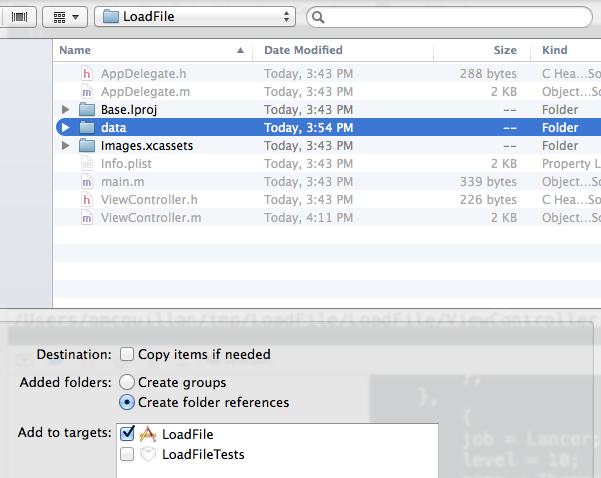
Select the file or folder you want to add. If you are adding a folder, select the option to Create folder references this will maintain the relative directory structure on the device by copying the folder as well.

Notice how the folder has a blue icon. Blue folder icons represent file or folder references. A regular yellow colored folder represents a group in xcode. Groups are not real folders on the file system, they are just something to use to organize your code in Xcode’s Project Navigator.
Step 2 - Locate the file
Now that we’ve got the file being copied to the app and in the proper folder, we
need a way to locate that file location. Would it have made sense for apple to
allow us to use a relative path like "data/party.json" to get the file? Yes,
it would have. Did they allow us to do something like that? No, no, they didn’t.
Introducing [NSBundle pathForResource:ofType:inDirectory:] using this neat
little doo-hicky we can pull out the file name. According the documentation, it
returns An array of full pathnames for the subpath or nil if no files are
located.
So let’s grab our file name and throw it into a string:
  NSString *fileName = [[NSBundle mainBundle] pathForResource:@"party"
         ofType:@"json"
    inDirectory:@"data"];
Docs say we will get nil if it can’t find the file, so now we check for nil:
  if (fileName) {
      // ...
  }
  else {
    NSLog(@"Couldn't find file!");
  }
Step 3 - Pull file content
To pull file content we’ll use the [NSData initWithContentsOfFile:]
initializer:
if (fileName) {
  NSData *partyData = [[NSData alloc] initWithContentsOfFile:fileName];
}
If your file is just a string there’s a different method you can use to pull the
string from the file directly:
[NSString stringWithContentsOfFile:encoding:error:]
(more details)
Step 4 - Converting JSON NSData into an NSDictionary
Now we’ll convert the NSData object into an NSDictionary, since I’m pulling JSON data:
  NSError *error;
  NSDictionary *party = [NSJSONSerialization JSONObjectWithData:partyData
    options:0
      error:&error];

  if (error) {
    NSLog(@"Something went wrong! %@", error.localizedDescription);
  }
  else {
    NSLog(@"party info: %@", party);
  }
Finishing up
That’s it! Fairly simple.