I previously wrote an article about creating app flavors on Android and I had planned on writing another about how to do the same on iOS.
While Android already has a built in mechanism for creating what Google calls App Flavors, iOS unfortunately does not. However, we can tweak the Xcode build tools to do something similar.
Achieving Flavors in iOS
Goals:
- Allow multiple versions of our app loaded on the phone side by side
- Distinguish between one version or the other
- Allow us to make different decisions depending on flavor.
I think these are all self explanatory except for maybe #3. When developing on a multi-stage environment it may be desirable to, for example, point our app to a different API server for development builds than for production builds.
Another example would be a paid app vs a free app, wherein the free flavor will show annoying ads and the pay flavor will remove them.
This decision making can be done using Objective-C’s preprocessor and a similar mechanism in Swift called conditional compilation blocks.
Conditional compilation blocks don’t give quite the same functionality as a preprocessor but they give us just enough to do what we want.
We will use Xcode’s user-defined [build] settings and build configurations to get what we want.
Create Build Configurations
To keep things simple for now we will change our build configurations so that we will have Dev, Staging and Production configurations.
Open up your Project settings
Duplicate the Debug configuration, and name it Staging. Rename your other configurations accordingly.
Note: I’m making a simple case and using 2 Debug configurations (Dev, Staging) and a Release configuration (Production) but ideally you’d have a debug and release configuration available for each flavor. This case isn’t demonstrating flavors as much as different environments, which may be a separate dimension from flavor.
Adding Build Settings
Switch over to the Build Settings tab.
Let’s create some user-defined settings. For clarity I like to prefix my
custom user settings. I’m using OBF for One Big Function, the name of
this site. Update yours accordingly.
For the example I’m using OBF_ENVIRONMENT.
If your app comes in different flavors like lite or pro (paid vs free) then
you might want to add something like FLAVOR also.
Open the disclosure triangle and set up your environment and/or flavor to their appropriate values for each build configuration:

- Dev gets a value of
DEV - Staging gets a value of
STAGE - Production gets a value of
PROD
Allowing Multiple Versions of the App Side By Side
To allow multiple versions of the app we need to change the app’s Bundle Identifier for each flavor.
Changing the bundle id will have certain side effects when it comes to code signing and provisioning profiles. The trick to this is to have more provisioning profiles created later with the new bundle ids.
I like to keep things separate because I think it’s a little bit cleaner, so
I’ll add another user-defined settings called OBF_BUNDLE_ID_SUFFIX. I
set the values according to their environments (or flavors):

I set the value to .$(OBF_ENVIRONMENT:lower) except for production which I
left blank. The :lower produces a lowercase version of my
$(OBF_ENVIRONMENT) setting, the result is:
- Dev gets a value of
.dev - Staging gets a value of
.stage - Production gets a blank value because I don’t want any extra suffix when I submit my app to the store.
Don't forget to add the . in front of the
$(OBF_BUNDLE_ID_SUFFIX)
Add $(OBF_BUNDLE_ID_SUFFIX) to the end of your Product Bundle
Identifier and you can now have multiple version of the app side-by-side!

Making the Settings Available to Code
To make the settings we just created available to code we’ll add them to the Active Compilation Conditions (Swift only) on the same screen.

In my example I added ENV_$(OBF_ENVIRONMENT) to the list.
I can now use these values in swift using a compilation condition:
#if ENV_DEV
print("I'm in dev!")
#endif
For Objective-C projects we can specify these flags under the Preprocessor Macros setting.

In my example I added ENV_$(OBF_ENVIRONMENT)=1. The =1 is necessary for
setting flags as this evaluates to true in our preprocessor checks:
#ifdef ENV_DEV
NSLog(@"I'm in dev!");
#endif
Whether you use that ENV_ prefix or not is entirely up to you but it may be
cleaner in the long run if you end up with a lot of compilation conditions.
A More Practical Code Snippet
Since in my whole example I’m only using the concept of app flavors to change environments, let’s see a quick example of how we can accomplish this. First, in swift:
enum kUrl {
  static var baseUrl: String {
    #if ENV_DEV
    return "https://url.dev"
    #elseif ENV_STAGE
    return "https://url.stage"
    #elseif ENV_PROD
    return "https://url.com"
    #endif
  }

  static let users = "\(baseUrl)/users"
}

// now the urls can be accessed from the `kUrl` enum, as follows:
print("Base URL: \(kUrl.baseUrl)")
You will notice I didn’t include a catch-all #else. This was intentional.
These are compilation conditions. This means that if there is no else, the
build will fail, which is exactly what I want. I want it to be called to my
attention that the string has not been set, rather than wondering why I am
getting unexpected results from my app at runtime. This works because it will
cause the app to fail early and it won’t even run, so end users will never
encounter this scenario.
Objective-C would be something similar:
#ifdef ENV_DEV
static NSString *const kUrlBase = @"https://url.dev";
static NSString *const kUrlUsers = @"https://url.dev/users";
#elif ENV_STAGE
static NSString *const kUrlBase = @"https://url.stage";
static NSString *const kUrlUsers = @"https://url.stage/users";
#elif ENV_PROD
static NSString *const kUrlBase = @"https://url.com";
static NSString *const kUrlUsers = @"https://url.com/users";
#endif

// ...

NSLog(@"Base URL: %@", kUrlBase);
NSLog(@"Users URL: %@", kUrlUsers);
In the Objective-C version I took a different approach instead of using
concatenation since this is a hairy area in general. It makes updating the base
URL more tedious but gives the flexibility of having radically different URLS
everywhere. Concatenation using [NSString stringWithFormat:] would require us
to do so at runtime, with a function of some sort.
Distinguishing One Flavor From Another
Now that we have different versions of the same app on the device, they all look very similar, which is problematic.
Depending on how you use flavors, the answer might be obvious — just change the name of the app!
Both app icon and app display name can be modified per-flavor, again using the Build Settings from before.
Changing App Name Per Flavor
Open the Build Settings for your target. This is similar to the project build settings, except you have to click on the target instead of the project.
Look for Product Name the default value at time of writing is
$(TARGET_NAME), let’s change this to use our environment name, with the
exception of production where we will continue to use $(TARGET_NAME).

If your product names are all blank chances are you're in the wrong place. Make sure it's under the target's build settings.
If your app has a totally different name based on flavor, you can just type it right in here.
In my example, I used $(OBF_ENVIRONMENT:lower) again, with the exception
of production where I named the app appropriately.
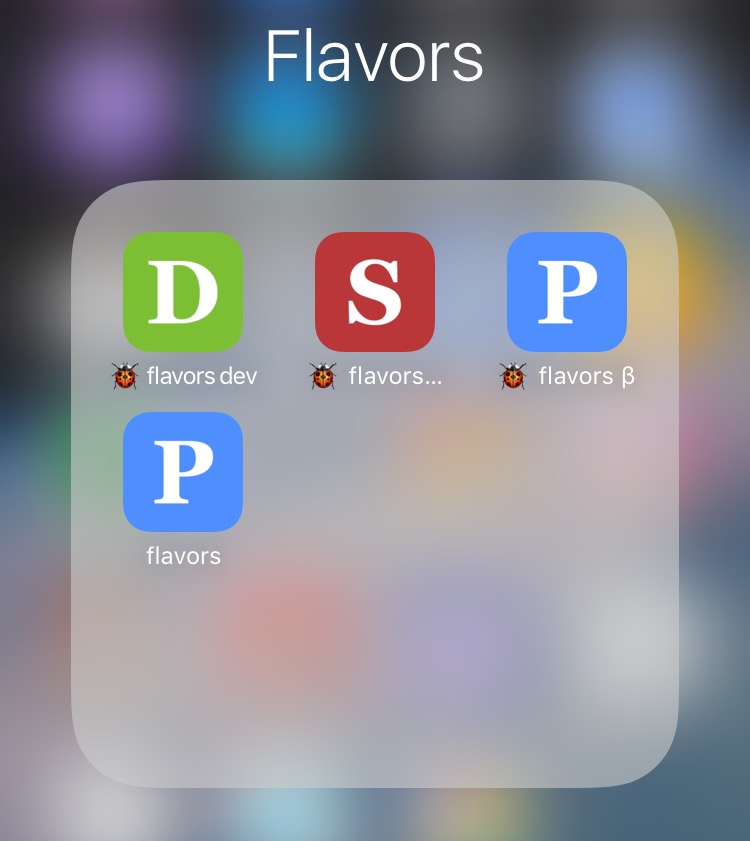
Changing App Icon Per Flavor
Here’s an example from a separate sample project I made to show you how you can dazzle things up using emoji to differentiate things like environments or debug vs release builds.
To change the App Icon per flavor, we can again edit our mighty Build
Settings on the target level. In my case I’ll change the Asset Catalog
App Icon Set Name from AppIcon to AppIcon$(OBF_BUNDLE_ID_SUFFIX)
![]()
This attaches the bundle id suffix to the name, resulting in:
- Dev uses
AppIcon.dev - Staging uses
AppIcon.stage - Production is uses the default
AppIcon.
In order for this to work we need to create 2 more iOS App Icon sets in our
Assets.xcassets and rename them accordingly.
![]()
Drop your images in and you’re done!
Switching Flavors
To switch between flavors you can either duplicate your build scheme or use the same scheme and switch by Option + Click-ing on the scheme at the top and switching the build configuration from the drop down.
